
Noise, uneven background or gaps?
This section offers three ways to improve the sky. Choose according to what you see in your photo:
- Sky noise reduction combines neighboring photos with their stars aligned. It aims to reduce grain while keeping stellar signal.
- Improve background and stellar signal calculates a statistical background and combines it with stellar signal. It can help when Lighten retains a noisy background.
- Trail filling tries to bridge gaps between observations. Use it for interruptions in the arcs.
Try each on its own before combining them.
| Visible problem | Tool and starting point | What to compare |
|---|---|---|
| Sky grain | Noise reduction: 2 neighbors per side, 60% | Background, faint stars and absence of doubling. |
| Uneven background and noise retained by Lighten | Improve background and stellar signal | Stellar separation and background texture. |
| Small regular interruptions | Conservative filling | Joined trails without thickening or bridges between different stars. |
| Intervals requiring motion estimation | Advanced experimental | Localized reconstruction matching observed paths. |
| Landscape affected by a sky effect | Stacking mask | Protected ground, including trees and buildings. |
Reduce noise without losing detail
More neighbors supply more observations but require alignable movement and signal. With clouds or elongated stars, increasing radius may reduce consistency or add no improvement because uncertain alignments are skipped. Start with two and increase only after comparing. Low strength retains more of the original photo; high strength favors the aligned average.
Compare at 100% with the same development in both versions. Raising exposure or clarity in only one also makes more noise visible and weakens the comparison. Inspect clear sky, then faint stars, then branches against the horizon.
Fill gaps between photos
Choose Conservative to try bridging small gaps before using the experimental mode. Maximum gap (s) limits the temporal interval considered for reconstruction; it is not a pixel distance or a promise to fill every pause of that duration. Cadence without EXIF (s) supplies frame timing when data is missing: use the real interval between captures rather than a value chosen to force more filling.
If your intervalometer took a photo every 30 seconds, use 30 seconds as fallback cadence when temporal data is absent. For a long pause, retain that fact and consider leaving a gap. Reconstruction estimates what happened between observations; it does not prove the trajectory of a star or object during the pause.
To see what filling added:
- Stack with your chosen method.
- Alternate Before gap filling and Show result over the same area.
- Enable Show reconstruction to locate additions.
- Check their direction and color. If bridges appear between different stars, lower Maximum gap, try Conservative, or disable filling and stack another version.
Which mask does each tool use?
The stacking mask separates sky and ground and protects the landscape from sky effects. Develop masks determine regional adjustments per photograph; pollution masks determine where background is estimated and subtracted. A proposal can supply a starting point, but accepting a stacking mask does not automatically update every per-photo selection.
A mask defines the area affected by a tool. In the editor, use:
- Polygon: mark a broad region with vertices.
- Add brush: include sky left out of the selection.
- Erase brush: remove rocks, branches or buildings from the selection.
- Radius: change brush size.
- Feathering: blend the selected edge with its surroundings to soften the join.
- Undo: remove the last stroke or vertex.
- Invert: swap selected and protected areas.
- Clear: erase the selection to start again.
Click Apply to keep changes or discard the edit to recover the previous mask.
Sky tools and mask editing
Trails groups these tools into four collapsible sections: Stacking, Sky noise reduction, Light pollution and Trail gap filling. Hover over controls to read contextual help. Expanded and collapsed states are preserved when switching languages.
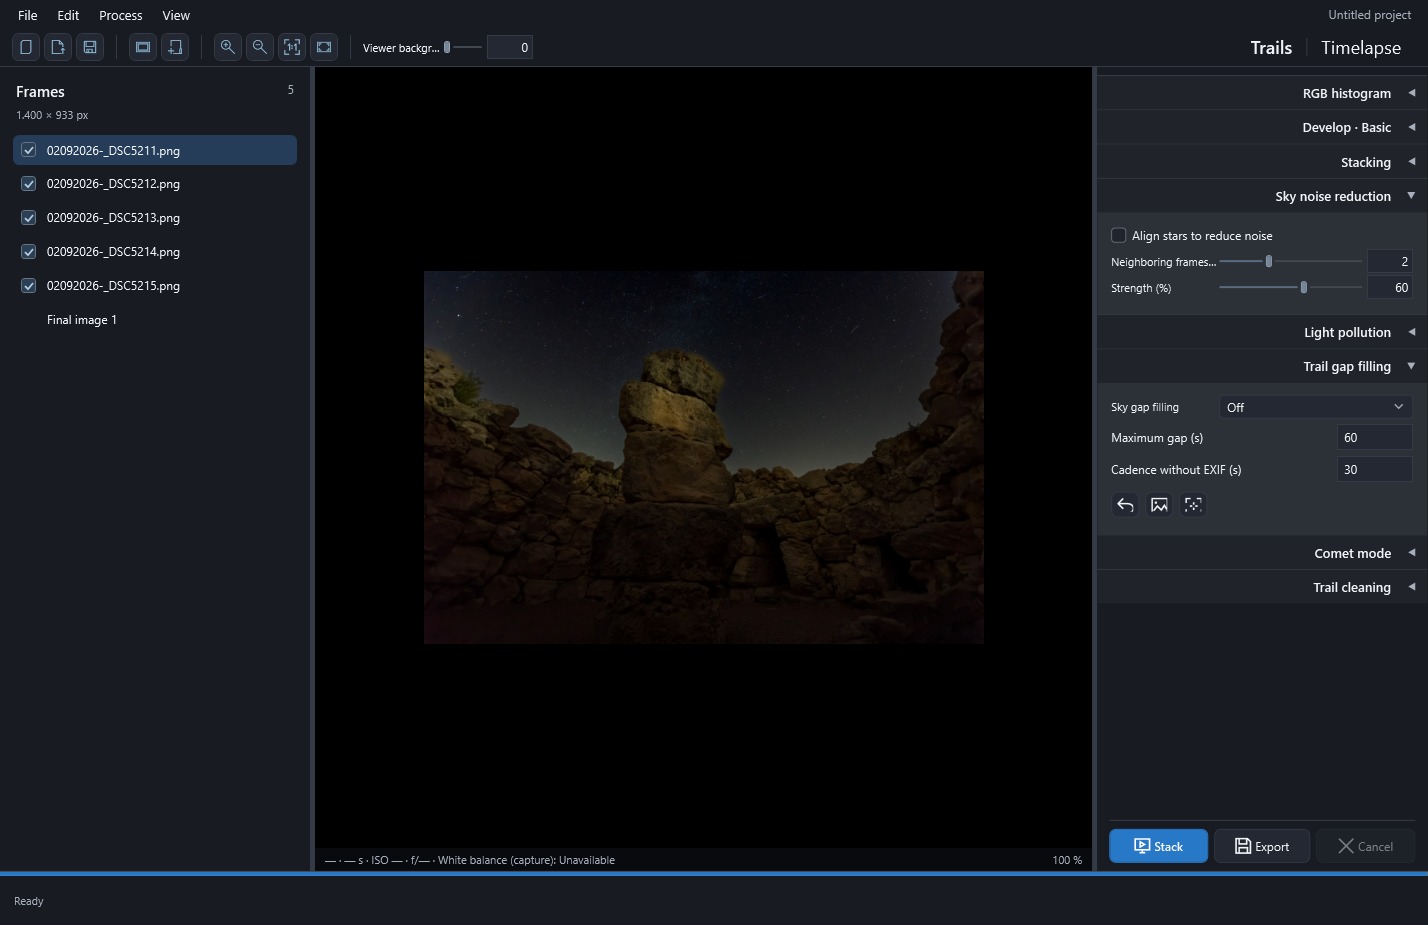
Sky noise reduction in Trails is intended for fixed-camera sequences without a tracking mount. To try it, review the mask and enable Align stars to reduce noise. Neighboring photographs are aligned to calculate an average, but each photo retains its own stellar position before trails are formed.
Neighboring frames per side lets you choose 1 to 4, or up to 3–9 frames including the central one; the default is 2. Strength (%), initially 60, determines the balance between that average and the original photograph. More neighbors mean more processing, and do not always improve the image: uncertain alignments are skipped, particularly with clouds, few stars or exposures that already show elongated stars.
The feature starts disabled and its configuration is saved with the project. It applies to Trails, not Timelapse.
To prepare the stacking mask:
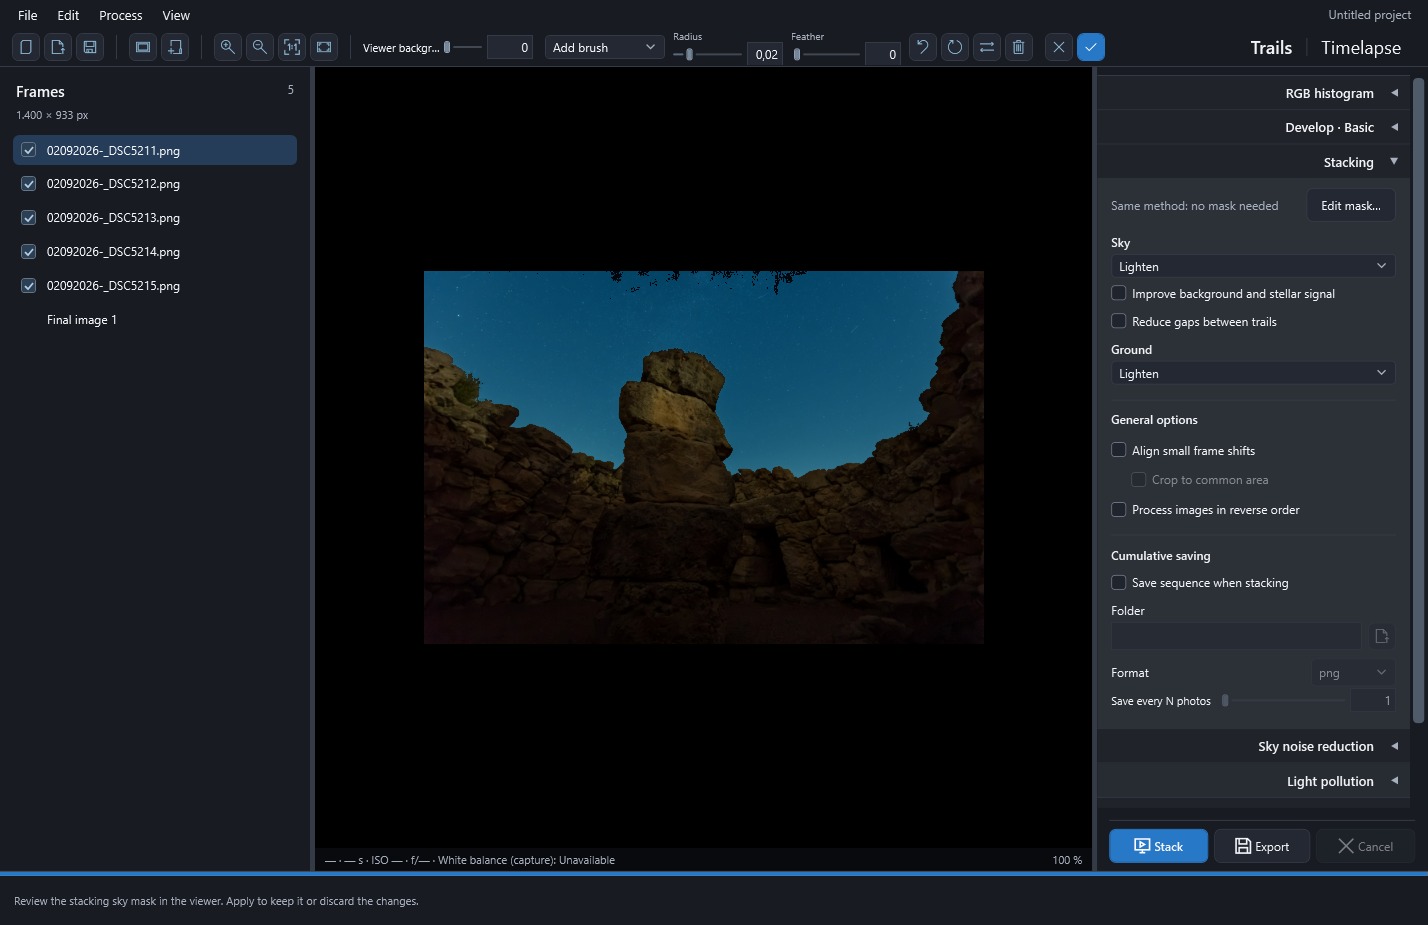
- Choose Stacking → Edit mask…. Editing opens in the main viewer over the first reference photo; sky is marked blue.
- Look at the proposal. The saved stacking mask is used first. If none exists, the photo's Develop mask is copied with its edits and feathering. If neither exists, sky is detected.
- Refine the horizon with the brushes. Around branches and leaves, erase vegetation and add only the openings of sky.
- Adjust Feathering and inspect the edge at 100%. A high value can spill onto the ground.
- Click Apply to save the common stacking mask, or discard to return to the previous one. Per-photo masks stay unchanged.
If the problem is in the accumulated background, try Improve background and stellar signal. It estimates a statistical background and retains stellar signal inside the mask, while you choose landscape processing separately in Stacking → Ground.
To join discontinuities, use Sky gap filling and choose conservative or advanced experimental; you can also leave it off. Conservative filling tries to close small gaps. Advanced reconstruction estimates motion from stars observed in different photographs, so it needs enough observations and can fail in difficult scenes. Set Maximum gap (s) and Cadence without EXIF (s) to match your capture: increasing those values does not guarantee more reliable detail.
After stacking, inspect gap filling with the row of three icons. From left to right, these are Before gap filling (return arrow), Show result (picture) and Show reconstructed regions (marked region). Hover to read their names, or reach them with Tab and activate them with Enter or Space.
These buttons change only what you see; they do not recompute the stack or alter the export. When comparing another tool, remember that it may use a different mask: the stacking mask is not a common automatic selection for every operation.
 Enlarge screenshot ↗
 Enlarge screenshot ↗
