
Choose how the stars will appear
A timelapse plays many photos in succession to show a night's events in seconds. Choose how time appears to pass:
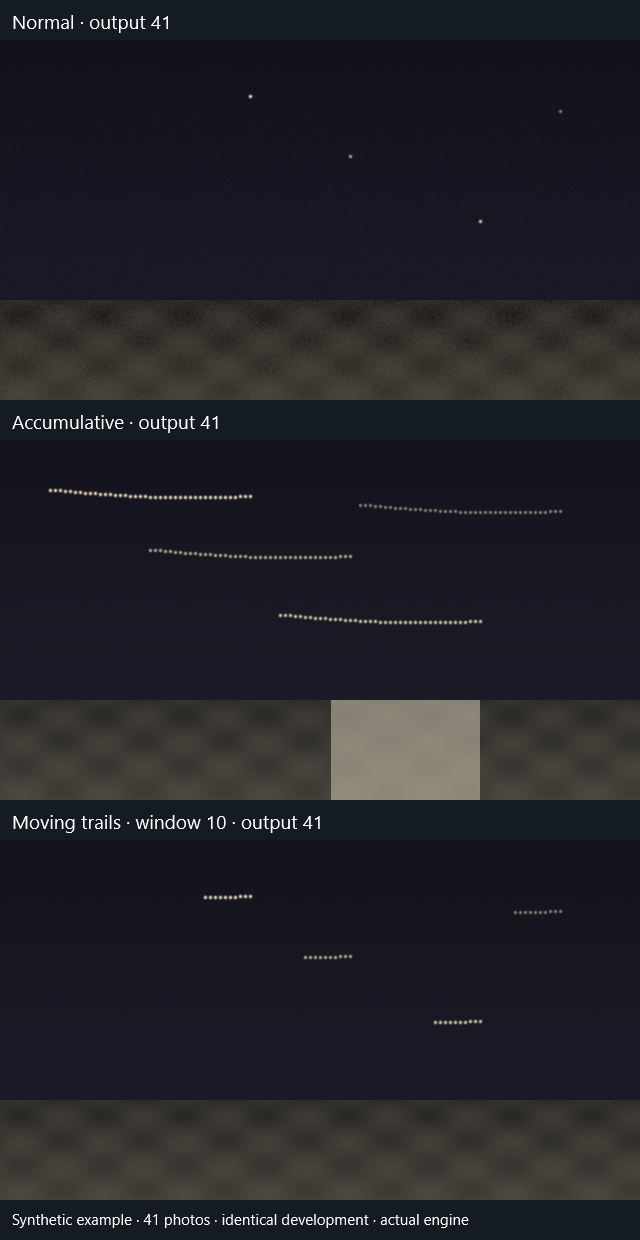
- Normal: each photo replaces the previous one. Stars move over the landscape.
- Accumulative: each frame keeps what has been stacked so far. Arcs gradually appear.
- Moving trails: only the latest N photos remain. Heads advance and older parts disappear, like tails traveling across the sky.
Start with Normal at 25 FPS. For a drawing animation, choose Accumulative and inspect the beginning and end. For tails traveling across the sky, choose Moving trails and start with a 30-photo window: a shorter window retains less path; a larger window keeps more history. If the window covers the full selection, early stages may resemble accumulation.
Comet adds temporal fading to trail modes. It does not extend the window or change source photographs. Define a mask to protect foreground and compare without comet first. In Normal, reconstruction and stacking options do not build arcs between output frames.
Control growth and comet fading
In Sequence and animation, Growth (s; 0 = automatic) sets how long trails take to grow. In Accumulative, short durations group contributions from several photos per output without omitting them; long durations repeat states without motion interpolation. For example, 600 photos over 12 seconds at 25 FPS produce 300 output frames. Keep Frame step at 1 to retain all photos.
Use Intro without trails (s) if you want to present the moving sky first. This part plays individual photographs, then accumulation begins with the last intro shot; earlier photographs do not contribute to the final trail. With a short sequence, states repeat and a later shot is reserved so growth remains possible. A single photograph has no animated intro.
At the other end of the video, Hold final result (s) freezes the last stack, including its comet, to leave time to view it. These timings and growth duration accept 0–3600 seconds, rounded to complete frames. Use 0 to omit the intro or hold. The controls apply to trail animations: Normal ignores them, and Moving trails supports duration and hold but no intro without trails.
To add comet fading to accumulation, define the sky mask and enable Comet fading in Trails and reconstruction. Then decide how the tail should accompany the growth: under Tail type, Proportional to trail lengthens with the stack and expresses length as a percentage, while Fixed length uses age in selected shots.
Once you have chosen the shape, refine its brightness with Fade curve and Minimum brightness (%). The first changes the curve—1 is linear and higher values emphasize the head—while the second determines how much older signal remains, from 0 to let it disappear to 100 to remove fading. In Moving trails, that signal remains only while its shot is within the window.
To fade stars while retaining the background, temporal comet estimates that background first and applies fading to stellar signal. This keeps the head at full intensity and preserves the chosen foreground method, but requires more processing passes. With few shots or persistent clouds, inspect the estimate carefully. Trails comet controls are independent.
After generating the preview, Start, 25 %, 50 %, 75 % and End inspect growth checkpoints, excluding intro and hold. Regenerate the preview after editing settings. Controls persist with the project. The default configuration uses automatic duration with no intro or hold.
What you can create with these tools
Choose the result you want to show first, then adjust the pace and tail appearance:
| I want to… | Starting configuration | What I will see |
|---|---|---|
| Show the full night's arcs being drawn | Accumulative, comet off, intro without trails at 0 | Each output adds path and retains previous contributions without temporal fading. |
| Draw arcs with a bright head and a growing tail | Accumulative, comet on, Proportional to trail tail | Trails grow while their older parts become fainter. A minimum brightness above 0 helps retain a visible history. |
| Follow a head with a tail of stable length | Accumulative, comet on, Fixed length, minimum brightness at 0 | Older signal fades according to its age, even though it remains part of the accumulation. |
| Make tails travel while old shots disappear | Moving trails, limited window and optional comet | Only the recent window remains; no contribution survives after leaving it. |
| Present moving stars, draw trails and leave time to view the result | Accumulative, intro without trails, growth duration and final hold | One video runs through all three phases. You can combine it with comet. |
The difference between a fixed tail and a moving window is what remains. In Accumulative, Minimum brightness (%) can retain faint signal from the entire accumulated path. In Moving trails, shots leaving the window disappear even when minimum brightness is above 0.
Example: draw trails with comet fading
This recipe shows trails growing with a prominent head while retaining a faint record of their path. The values are starting points; stellar brightness, clouds and spacing between photos affect the result.
- Import the sequence and review which photos are included. Prepare aircraft and satellite corrections if needed.
- In Timelapse → Sequence and animation, choose Accumulative, the desired range and Frame step: 1. Leave Intro without trails (s): 0 so the whole range contributes to the trail.
- In Format and framing, choose 25 FPS and 1080p for the first trial. In Sequence and animation, set Growth: 12 s and Hold final result: 3 s.
- In Trails and reconstruction, open Sky mask…. Check the horizon and keep foreground outside the sky before enabling Comet fading.
- Choose Tail type: Proportional to trail, Tail length: 70 %, Fade curve: 2 and Minimum brightness: 15 %. This highlights the head while retaining a faint record of older contributions.
- Click Preview or press F5. Use Start, 25 %, 50 %, 75 % and End to inspect growth. Also play the full video to judge its pace and the final three seconds.
- For a more visible tail, increase its length, lower the fade curve value or raise minimum brightness. To concentrate light near the head, make the opposite changes. Change one control at a time and regenerate the preview.
- Restore the full range if you tested a short section, then export the MP4. You can also export an image sequence for assembly in another editor.
With 600 selected photos and these settings, without an intro, growth produces 300 frames: each incorporates two photos. The hold adds 75, making the video 15 seconds long. To produce growth without fading, turn comet off and retain the same timings.
Add an introduction without trails
To begin with moving stars and then draw the arcs, add Intro without trails: 2 s to the recipe above. With 600 selected photos at 25 FPS, the intro shows the first 50; accumulation starts at photo 50 and continues through photo 600. Photos 1–49 appear in the intro but do not contribute to the final arc. Total duration is 2 s intro + 12 s growth + 3 s hold = 17 s, or 425 frames.
The intro cannot turn stars that are already elongated in the original photos into points. To start with point stars, the capture exposure must have retained that appearance. If there are too few photos for the requested intro, states repeat: increasing time does not add new stellar positions.
To retain the whole selected range in the final trail, leave the intro at 0. The final hold freezes the completed stack; the head stops advancing and the tail does not continue fading during that hold.
Choose a tail and understand its length
Proportional to trail suits a tail that lengthens as the arcs are drawn. Tail length (%) refers to the stack available at that moment: a smaller percentage concentrates brightness into less of the path. A value of 100 % covers the whole current path but still applies fading. To remove temporal fading, turn comet off or set Minimum brightness (%) to 100.
Fixed length suits a stable temporal distance behind the head. Fixed tail (shots) counts selected photos, not video frames or seconds. For example, a 30-shot tail reaches minimum brightness at an age of 30 photos. If growth adds two photos per output, that age corresponds to 15 video steps. Changing duration changes how quickly the tail is traversed; it does not change the control's unit.
Fade curve controls how brightness falls within the tail: 1 is linear; above 1, light concentrates closer to the head; below 1, more brightness remains in the middle part. Minimum brightness (%) determines the signal retained at the old end of the tail. A value of 0 lets it disappear; a small value leaves a record of the path. In all cases, inspect the result on your own photos.
If growth does not look as expected
| What I notice | What to check |
|---|---|
| Gaps between trail segments | Keep Frame step at 1. Shortening Growth preserves accumulative contributions but does not fill pauses already present in the capture. Review gap-filling options if appropriate. |
| A longer video moves in jumps or stays still for some steps | More outputs were requested than available states, so states repeat. Reduce duration or use more photos; new motion is not interpolated. |
| The tail disappears too soon | Increase its length, lower Fade curve or raise Minimum brightness (%). In Moving trails, also check the window size. |
| The entire trail looks equally bright | Check that comet is enabled and minimum brightness is below 100 %. Lower that minimum or increase the fade curve to highlight the head. |
| The final arc starts later than expected | Check Intro without trails (s): accumulation starts at its final photo, not the first photo of the range. |
| Percentage checkpoints do not show the intro or hold | Those buttons inspect growth only. Use playback or the position control to browse every phase. |
| Comet seems to affect foreground or the sky changes unexpectedly | Review the sky mask and compare with comet off. Few shots, persistent clouds or changing light limit background estimation. |
Set the pace and framing
- Use First frame and Last to choose the part of the sequence to show.
- Leave Frame step at 1 to start. This decides whether to use every photo or every Nth photo: a larger step shortens the film but can make motion jumpy.
- Choose FPS, the number of frames played each second.
- Choose resolution and, if needed, set a Fixed crop. This crop stays the same throughout the film.
- Enable Reverse order to play the night backward.
With automatic growth and no intro or hold, 300 output frames at 25 FPS last 12 seconds and at 50 FPS last 6 seconds. Step 2 over 300 photos leaves 150 outputs and 6 seconds at 25 FPS, before other exclusions. Use the application's actual summary for the final count when setting a duration.
Choose 1080p for a quick trial and 4K for more detail when sources allow. Original retains resolution for sequences intended for another editor. Fixed crop removes an edge or centers interest; inspect beginning, middle and end to ensure the subject stays within the rectangle. The crop remains fixed throughout the video.
Result comparison
To make the difference easy to see, this example uses 41 synthetic photos processed by the app with identical development. In your photographs, the result will also depend on the sky and how you captured it.
Range, format and framing
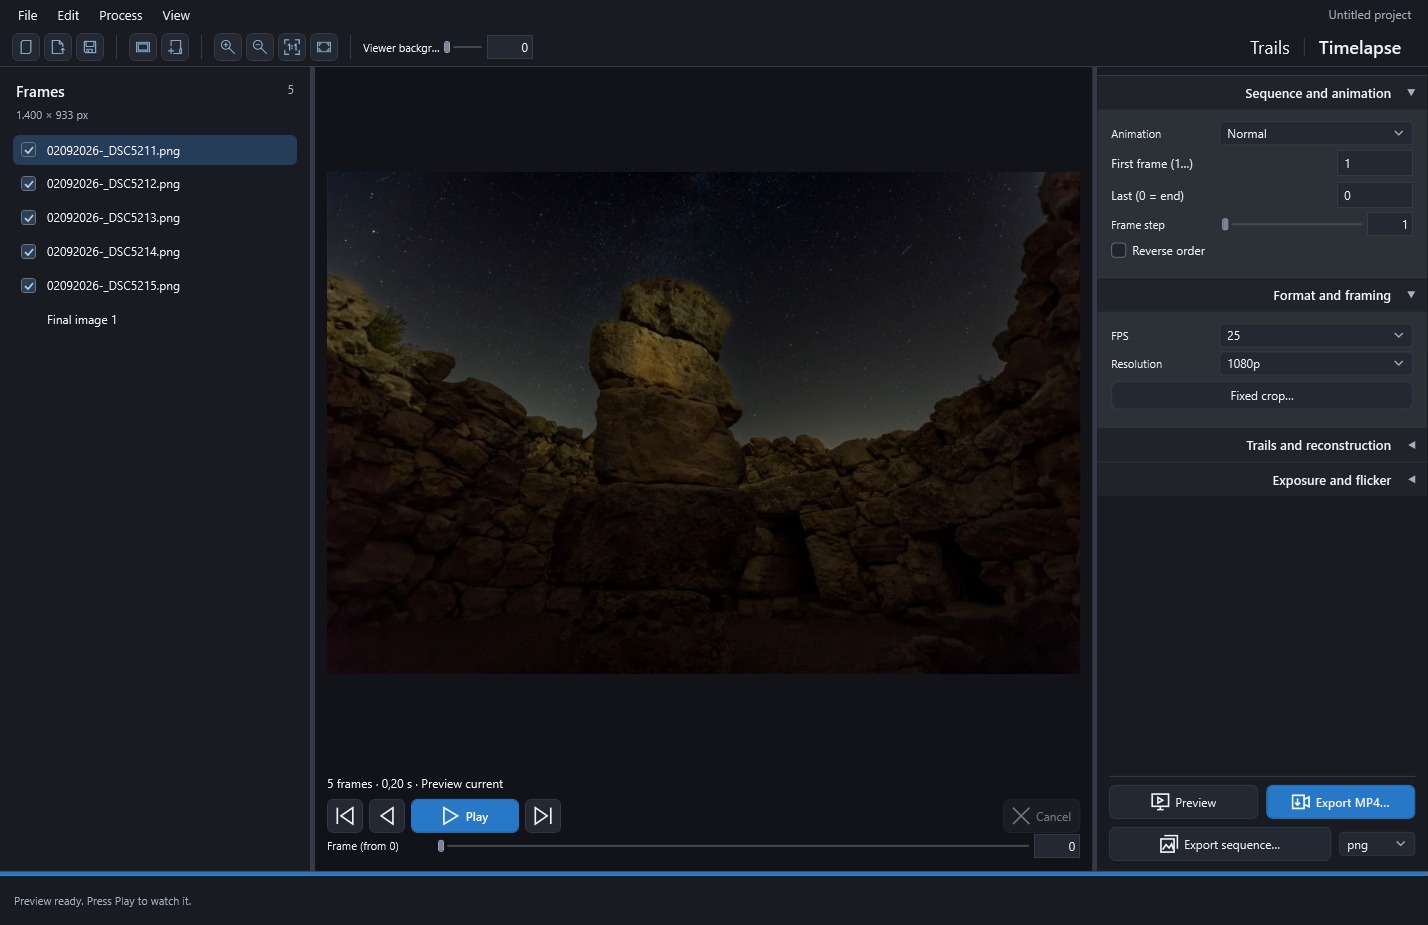
Choose any of the three modes under Sequence and animation.
- First frame: where the range begins, counting from 1 among included photos.
- Last: where it ends; enter 0 to use the rest of the sequence.
- Frame step: spacing between photos used. At 1, all are used; at 2, every other photo is used.
- Reverse order: plays the range backward.
Endpoints reserved as cleanup references do not produce output frames. Duration is output count divided by FPS: 300 at 25 FPS lasts 12 seconds. Intro and hold timings add outputs; long growth can repeat states, but the app does not interpolate new stellar positions. Check the summary for the total duration.
In Format and framing, choose 24, 25, 30, 50 or 60 FPS and an output resolution. 1080p and 4K set maximum heights of 1080 and 2160 pixels, preserving proportions without enlarging small images. For further work in another editor, Original · sequences retains native image resolution; this option is unavailable for MP4.
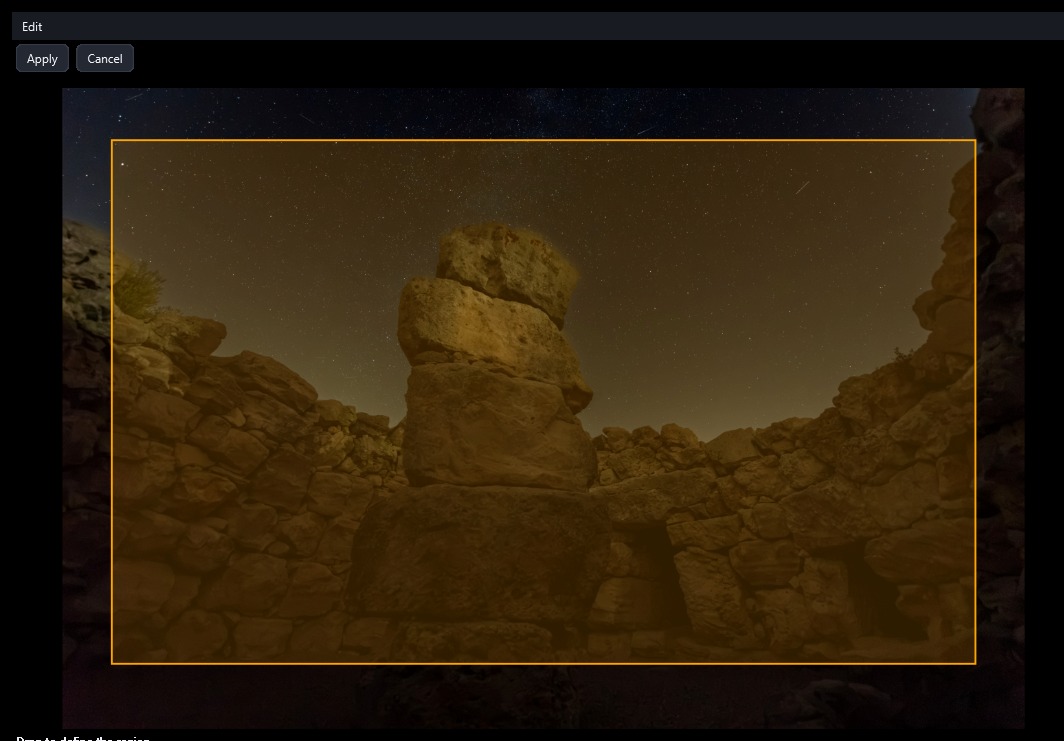
To change composition, open Fixed crop…, drag the rectangle that will define the output, then apply or cancel the selection. The same crop is used throughout the video, without animated pan or zoom.
Under Trails and reconstruction, adjust moving-window length, comet fading, mask, improved stacking and filling. Normal mode skips stacking and trail reconstruction. Temporal comet fading needs a sky mask to protect foreground.
 Enlarge screenshot ↗
 Enlarge screenshot ↗