
Here are three complete workflows, from your photos to export. Choose the one closest to what you want to do. The example values get you started; you can then adjust them for your own photos.
RECIPE 01
Clean star trails
When this helps
You have a tripod-mounted sequence and want to combine the stars' paths into one image. Some photographs contain aircraft or satellites. The aim is to retain stars and any meteors you want while correcting only unwanted trails.
Before you start
Temporal cleaning needs at least three consecutive photographs of the same framing and dimensions; short trails may need more. Import the whole sequence and save the project. RAW or 16-bit TIFF retains more input information; JPEG is also supported.
Start in Trails → Lighten, with comet, gap filling, improved stacking and sky noise reduction off. Enable camera alignment only for small camera shifts: it does not track the stars.
Step by step
- Make a reference stack. Review the included photos and exclude shaken frames or lights you do not want to combine. Leave correction off and click Stack to see your starting result.
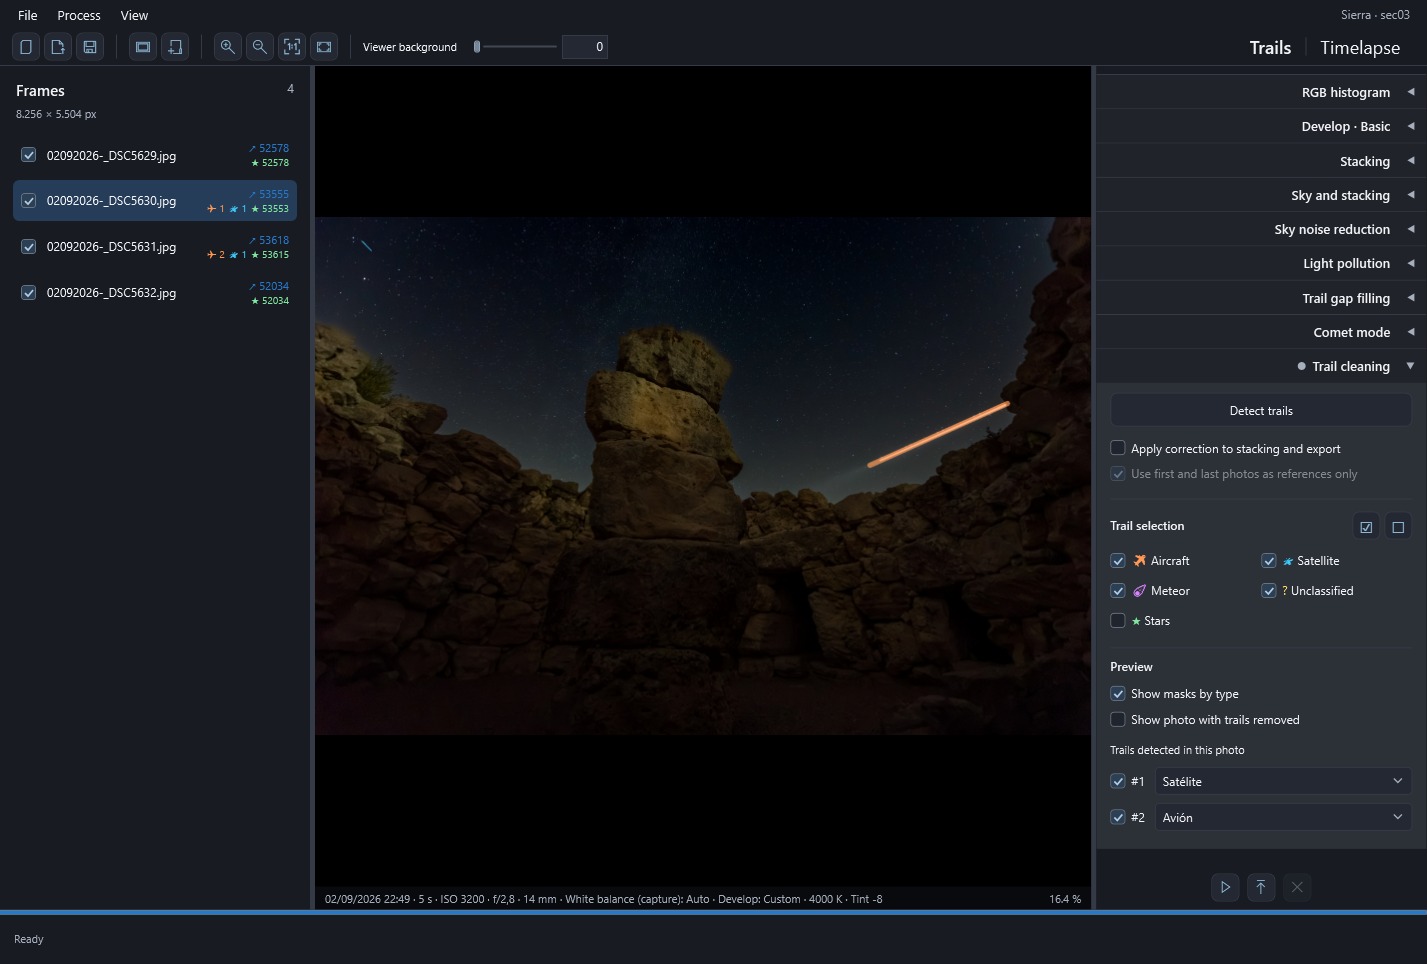
- Detect trails. Under Trail cleaning, click Detect trails and wait for temporal validation to finish. Analysis does not require correction to be enabled yet.
- Choose what to retain. Browse frames with Show masks by type. Uncheck candidates you want to preserve. Leave Stars unchecked; if you used All, uncheck Stars again.
- Inspect the cleanup. Enable Show photo with trails removed and hide the masks. Check the corrected area and any stars crossing it. If a correction damages detail, uncheck that candidate.
- Choose how to handle endpoints. Enable Apply correction to stacking and export. With Use first and last photos as references only, those two photos help clean interior frames but do not contribute to the result. Turning it off includes them; aircraft or satellite trails at the endpoints may remain because neighbors on both sides are unavailable.
- Stack and develop the result. Click Stack again. Select Final image to adjust exposure, white balance and contrast. Restack after changing input-photo development.
- Save the image and project. Export 16-bit TIFF per channel for further editing, or JPG for sharing. Save the project too, to retain selections and settings.
Before calling it finished
At 100%, inspect former aircraft trails, crossings with stars and the horizon. Stars should remain present and unchecked candidates should be retained. Check that omitting endpoints has not shortened the stellar paths more than intended.
If an unwanted trail remains, check that its candidate and the correction toggle are enabled, then stack again. If stars have disappeared instead, check that stellar removal is not selected. Once the base is clean, you can add comet or gap filling and evaluate each effect separately.
Read more about detection and cleaning, development and export.
RECIPE 02
Less sky noise with a protected foreground
When this helps
The landscape stays fixed while stars move between frames. You want star trails over a less grainy sky while retaining sharp rocks, trees and buildings. This recipe is intended for a fixed camera without a tracking mount.
Before you start
Prepare consecutive photos with enough stellar signal. Starting with two neighbors per side is most useful with at least five photographs; endpoint frames use the available neighbors. Already elongated stars, clouds or too few stars can make alignment difficult.
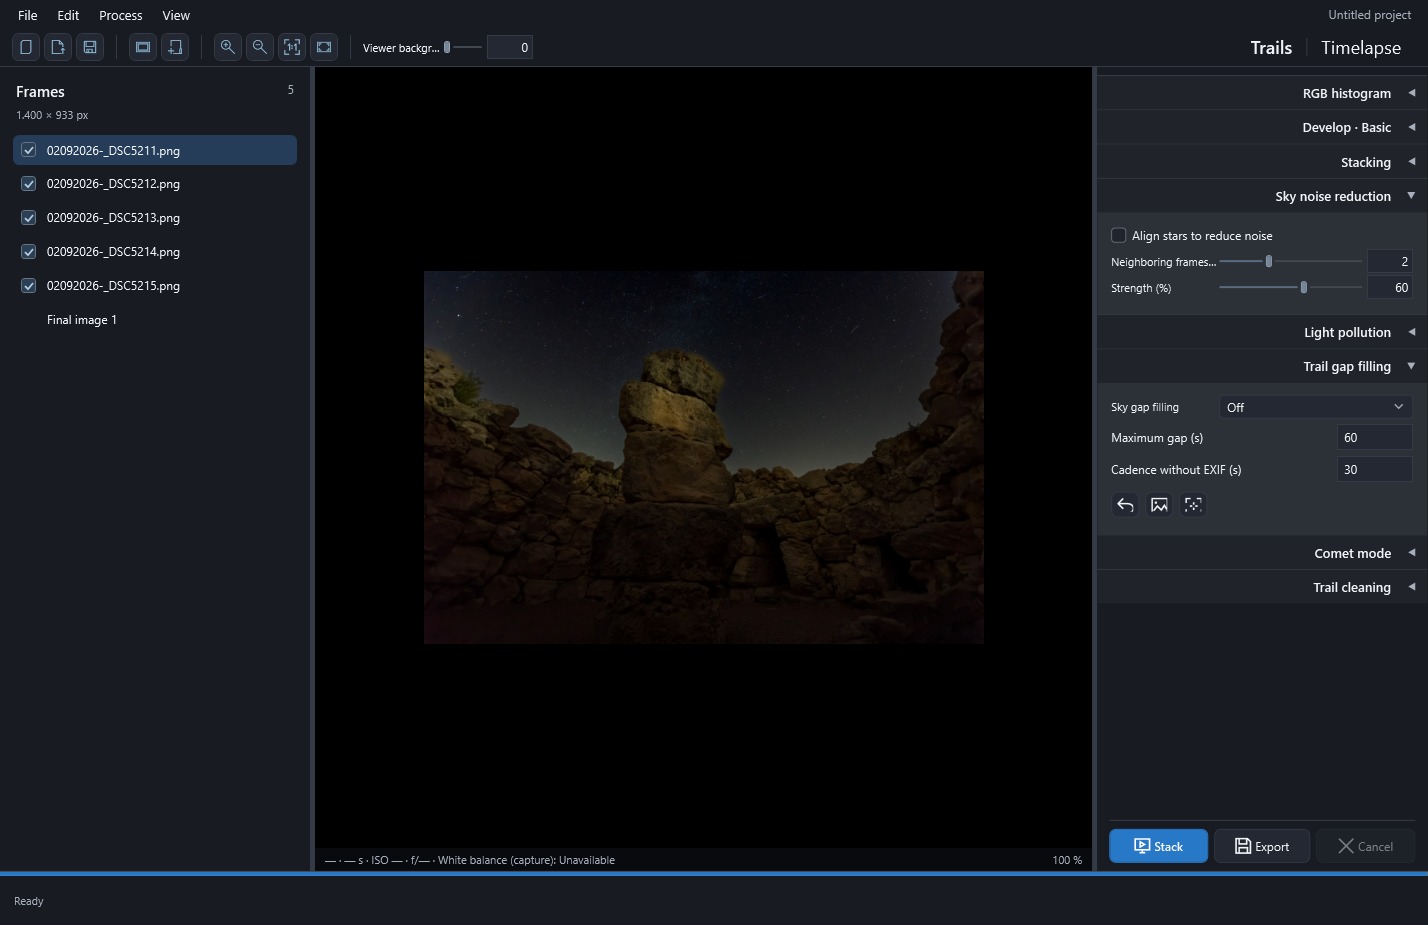
Start with Neighboring frames per side: 2 and Strength: 60%. Keep improved stacking, comet and gap filling off for the first comparison. You can retain cleanup already reviewed in the previous recipe.
Step by step
- Save a reference without noise reduction. Stack with Align stars to reduce noise off and export a TIFF. This lets you compare the same framing without relying on visual memory.
- Define the sky. Open Stacking → Edit mask…. Protect the foreground and inspect the horizon at 100%. Around branches and leaves, erase vegetation from the selection and add only the sky openings.
- Enable reduction. Under Sky noise reduction, enable Align stars to reduce noise, with two neighbors per side and 60% strength. This sky alignment is separate from camera-shift compensation.
- Stack again. The app combines neighboring frames by aligning their stellar signal before trails are accumulated. Processing takes longer; uncertain alignments are skipped.
- Compare at 100%. Export the new result and compare it with the reference TIFF. Inspect background grain, faint stars and the landscape boundary; avoid judging only a fit-to-window preview.
- Change one setting at a time. If stars appear doubled or develop halos, lower strength or the number of neighbors and restack. For a stable sequence, try three or four neighbors per side and check whether they improve the result.
- Finish development and export. Once the comparison is satisfactory, adjust Final image and export 16-bit TIFF per channel. Test Improve background and stellar signal in a separate comparison if you also want to evaluate its statistical background processing.
Before calling it finished
Look for reduced grain without doubled stars, lost faint signal or altered foreground texture. Pay particular attention to trees and branches against the sky.
If the landscape changes, refine the mask and stack again before adjusting strength. If stars still deform, disable this reduction for the sequence and keep the reference version. The aim is to reduce noise while retaining each frame's stellar position as trails are built, rather than turning accumulated arcs into point stars.
See sky masks and noise reduction and stacking options.
RECIPE 03
A clean timelapse
When this helps
You want a film of stars moving over a fixed landscape, without accumulating trails from one photo to the next. Start in Normal mode. Accumulative and Moving trails produce different types of animation.
Before you start
Review sequence order and exclude photos you do not want to play. To remove aircraft or satellites, prepare cleanup in Trails using the first recipe: included photos and cleanup decisions are shared between modules.
Calculate duration from output frames, not simply imported photographs: 300 frames at 25 FPS last 12 seconds. Range, frame step and cleanup reference endpoints can reduce that count. Check the Timelapse summary.
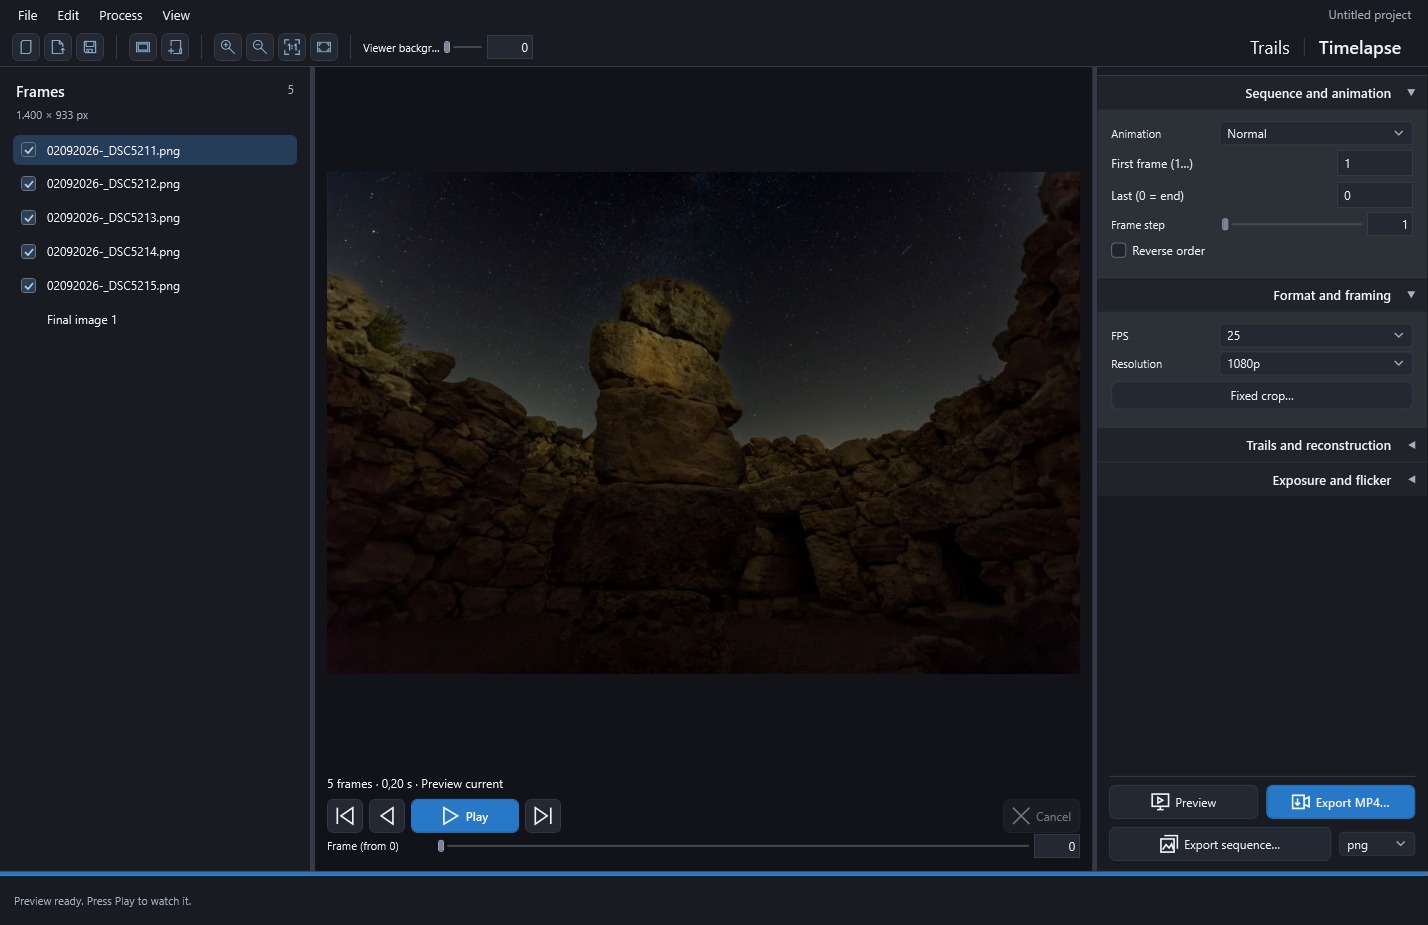
Start with Normal, 25 FPS, 1080p, a frame step of 1 and reverse order off. Leave deflicker off until you have checked whether it is needed.
Step by step
- Try a short section. In Timelapse, select part of the sequence with First frame and Last. Keep Frame step: 1 to inspect every output frame in that section.
- Prepare the framing. Select 1080p and 25 FPS. Use Fixed crop… if needed, checking that important parts of the scene stay inside the rectangle.
- Generate and navigate the preview. Click Generate preview. Play it or move the position control to the beginning, middle and end. A paused preview shows only its current frame: check that stars change position as you advance.
- Correct flicker if it occurs. If brightness jumps between frames, enable Reduce flicker and choose a broad, stable Reference region…, avoiding headlights, floodlights and clouds moving in or out. A temporal radius of 10 frames is a starting point. Regenerate the preview and check that natural light transitions remain.
- Choose whether to include photo development. Enable Apply photo development to include individual adjustments prepared in Trails. It does not use Final image development or interpolate adjustments between photos; check for jumps if their values differ.
- Restore the full range. To use the whole included sequence, return to First frame: 1, Last: 0 and Frame step: 1. Check duration and regenerate the preview after your changes.
- Export and inspect the file. Export MP4 at 1080p or 4K for playback. For further editing or color treatment in another editor, export a 16-bit TIFF sequence per channel. Play the exported result to verify motion, framing and duration.
Before calling it finished
In Normal mode, the landscape may remain still while stars move. Review several points in the sequence, light transitions and the displayed duration. If endpoint photos are reserved for cleanup references, they should not generate output frames.
If the video looks like a still image, browse different preview positions and check that there is more than one output frame and different photographs within the range. If motion is correct but the video is too short, include more photos, reduce frame step or choose a lower FPS. In this mode, changing FPS changes duration without creating intermediate frames.
See sequence and framing, exposure and flicker and export.
Concepts used in the recipes
| Term | Meaning in StarTrail Studio |
|---|---|
| Frame / photograph | An input photograph; a video frame is an output image. |
| Included | A checkbox determines whether a photograph participates in processing. |
| Selected | A highlighted row for viewing or syncing; does not change inclusion. |
| Candidate | A detected trail to review; its automatic classification is approximate. |
| Mask | A region receiving an effect; trail, sky and pollution masks have different purposes. |
| EV | Exposure stop: +1 doubles and −1 halves the signal. |
| FPS | Frames per second; higher FPS shorten video for the same number of images. |
| Project | References and decisions saved in .stproj; original photographs are still needed. |
| Preview | A review view, possibly reduced; regenerate it after changes. |
| Export | A final image, video or sequence saved to disk. |