
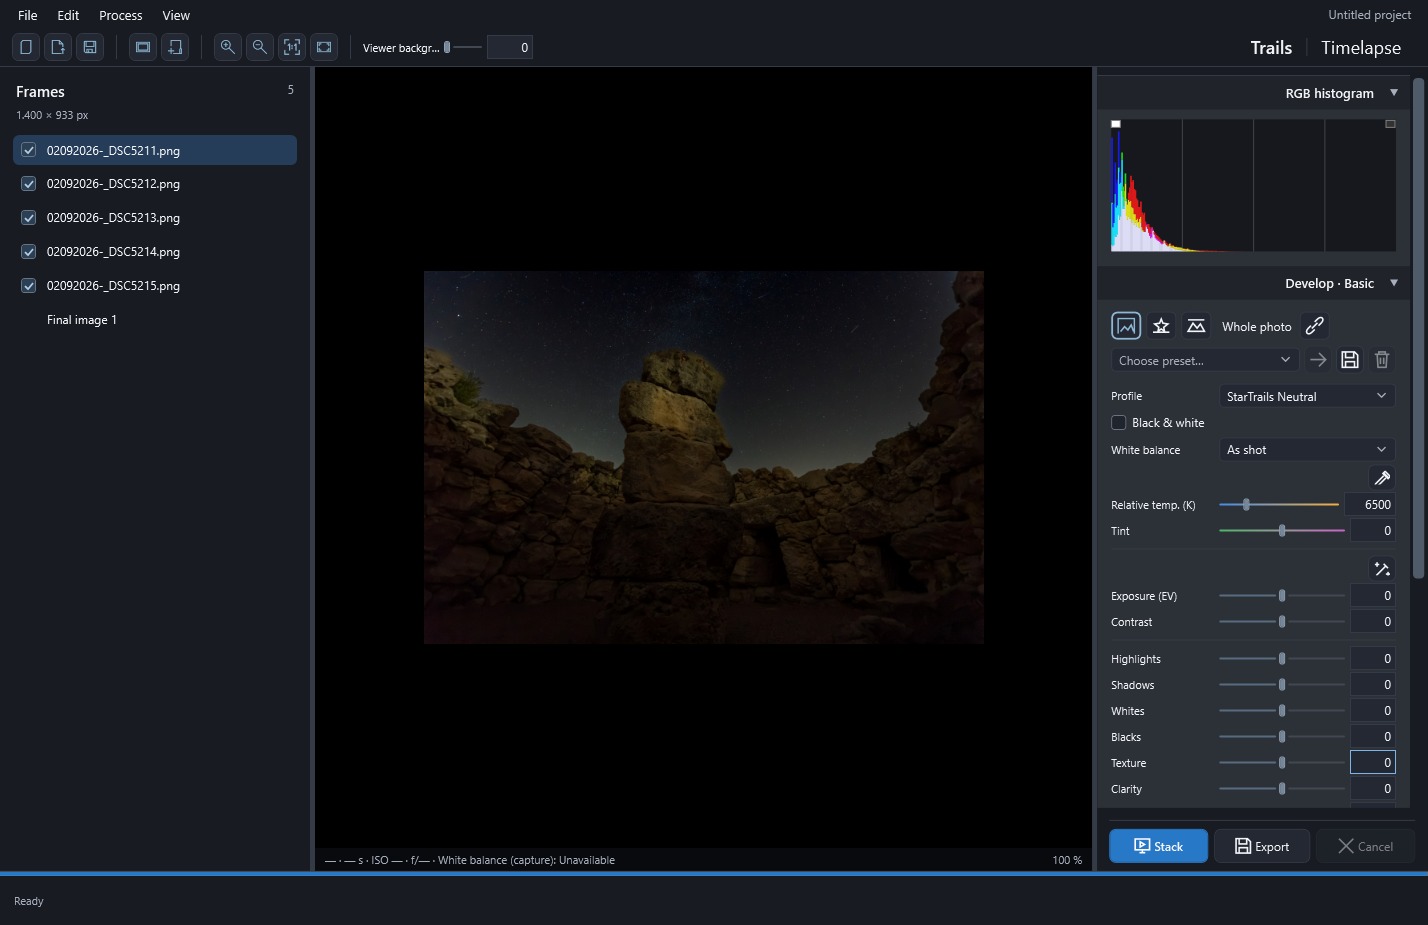
The window has three areas: photographs on the left, the viewer in the middle and tools on the right. The bottom bar tells you what the app is doing and lets you cancel an operation.
Choose between two kinds of work:
- Trails combines the stars' paths into a photograph.
- Timelapse turns the photos into a movie. You can show stars moving or animate their growing trails.
Both modules use the same included photos and cleanup decisions. Reconstruction and light pollution settings are separate; the reconstruction sky mask is shared.
In the photo list, a checkbox decides whether a photograph contributes to processing. Clicking its row chooses what you view and edit. Before developing, also check whether you have selected an original or a Final image.
Find your way around the window
Think of the window as a path from left to right: choose your material in Frames, examine the image or video in the center, and decide how to process it with the tools on the right. Drag the vertical dividers to give more room to the list, viewer or settings.
At the top are the menus, project name and a toolbar with shortcuts for adding images or folders, viewing controls, and the Trails and Timelapse buttons. The active module is highlighted. Switching modules lets you use the same originals for a different kind of output; it does not start another project or discard completed stacks.
| Area | What you will use it for | What changes between modules |
|---|---|---|
| Frames, on the left | Review originals, choose which enter processing and retrieve completed versions | The list is shared. Choosing a row does not choose the playback position. |
| Viewer, in the center | Examine a photo, stack, mask or video preview | Trails provides photographic inspection; Timelapse adds playback and navigation through output frames. |
| Tools, on the right | Prepare settings for the active module | Trails organizes development and stacking for an image; Timelapse organizes the sequence, animation and video output. |
| Bottom bar | Follow the current operation, read progress and cancel | The message describes processing even if you are browsing another photograph. |
Frames: originals, selection and results
Frames lists imported photographs with a name and inclusion checkbox. Its header shows the number of originals and a summary of their dimensions, with a warning if included photographs have incompatible sizes. After trail detection, rows also show the ↗ count and badges by type. These figures help locate photographs needing review; they are not the output video frame count.
Click an original's name to make it the active photo. In Trails it loads in the viewer and its development settings appear on the right; Trail cleaning also shows its candidates. The checkbox works independently, so you can inspect an unchecked photograph without including it in processing again.
Each completed stack adds a row at the end named Final image 1, Final image 2, and so on. These rows have no checkbox because they are results, not new sequence inputs. Select one to view that version, adjust its own development or export it. Changing stacking options afterward leaves that version intact until you create another with Stack.
For example, leave all originals included, select one to review an aircraft trail, then choose Final image 1 to assess the combined result. You do not need to uncheck the other photographs to change what you are viewing. The import chapter explains adding or removing entries and working with multiple rows.
Understand what the viewer is showing
The viewer does not always show the result of the settings you have just chosen. Before interpreting the image, check the active module and where the view comes from:
| Situation | What you are seeing | How to update or inspect it |
|---|---|---|
| An original selected in Trails | The active photo with its development and any enabled cleanup viewing options | Choose another row to inspect another shot. Hide masks to assess the photograph. |
| A stack in progress | A progress view once processing reaches frame combination | Wait for completion before judging the new version. |
| A selected Final image | That version's stored result with its output development | To apply other methods or effects, stack again and select the new version. |
| Mask editing | The reference photograph with the selection overlaid and editing tools available | Refine the selection and apply or discard it before continuing with the adjustment. |
| Timelapse before preview generation | The available reference image, which may be an original or a Trails result | Click Preview to calculate the animation. An image in the center does not mean a video preview has been generated. |
| Timelapse with a generated preview | The output frame at the current preview position | Use playback, step buttons or the position bar; regenerate after changing settings. |
Once a Timelapse preview exists, clicking another original changes the active photo for per-photo controls but does not replace the displayed video frame with that original. Return to Trails to inspect it as a photograph. This lets you review the video while keeping input selection separate from playback position.
In Trails, the top zoom controls help inspect the photograph and its masks; the viewer guide explains viewing at 100% and panning. The Timelapse preview fits the available space and is inspected with its playback controls. Changing photographic zoom or viewer background brightness does not alter exported framing or brightness.
The Trails tools
The right panel in Trails brings together the tools for preparing a star-trail photograph. Collapse sections to leave only the ones you need in view. They appear in this order:
| Section | What it does | What to check before using it |
|---|---|---|
| RGB histogram | Shows how light, shadow and color are distributed in the displayed image | Hide masks when assessing the photograph. |
| Develop · Basic | Adjusts light, color and detail for Whole image, Sky or Ground | Check whether an original or a Final image is selected: each has its own development. |
| Stacking | Chooses sky and ground methods, mask and reference, plus alignment, crop, order and cumulative saving | These values prepare the next stack without replacing a completed version. |
| Sky noise reduction | Combines neighbors with stars aligned before trails are formed | It needs a reviewed mask and is a Trails feature. |
| Light pollution | Corrects sky background and color cast in the active original | Check the photo and link state before sharing values and mask with included photos. |
| Trail gap filling | Chooses how to bridge discontinuities and compares reconstructed areas | Assess a version without filling first to distinguish observations from additions. |
| Comet mode | Shapes trails through fading | Sky must use Lighten. |
| Trail cleaning | Detects candidates, chooses corrections and reviews the active photograph before applying cleanup | Detection, displaying masks and applying correction are separate choices. |
Stack, Export and Cancel stay at the foot of the panel, outside the scrolling settings area. Stack calculates another version from included originals; Export saves the selected version when a Final image is active. If you are preparing a new result from originals, check the export workflow to understand what will be calculated.
Some adjustments, such as development of the active image, become visible immediately. Others, such as the stacking method or comet, need Stack. If an effect appears to make no difference, first check whether you are viewing an earlier completed version.
The Timelapse tools
Switching to Timelapse reorganizes the right panel around the video you want to produce. You do not have to stack a Trails image first: video is calculated from included originals and your chosen range.
| Section | What you choose here | When to use it |
|---|---|---|
| Sequence and animation | Normal, Accumulative or Moving trails; first and last shot, step, order and animation timings | Decide which part of the night to show and how trails build. Growth, intro and hold timings are enabled according to mode. |
| Format and framing | FPS, resolution and fixed crop | Prepare duration and output format without changing originals. |
| Trails and reconstruction | Moving window, comet, mask, improved stacking and filling | Use with modes that combine photographs; these tools do not form arcs in Normal. |
| Exposure and flicker | Video exposure, photo development, flicker reduction and light pollution | Adjust appearance and continuity of brightness across the sequence. |
Below the image are the frame count and duration summary, preview freshness status, and controls to return to the beginning, step back, play or pause, and step forward. Frame (from 0) selects a particular position. Start, 25 %, 50 %, 75 % and End navigate growth checkpoints; play or browse the whole sequence to inspect the intro and hold as well.
At the foot of the right panel are Preview, Export MP4… and Export sequence…, with an image format selector for the sequence. A preview lets you try settings but does not save the finished video. You can also export directly without previewing first. Find complete examples in the sequence and animation guide.
What is shared when you switch modules
Included photographs and cleanup decisions for aircraft, satellites, meteors and stars are shared. To change which candidate is corrected in a video, return to Trails → Trail cleaning, review the selection and regenerate Timelapse afterward.
Each module has separate stacking, filling, comet and light pollution settings. The common sky mask delimits stacking and reconstruction effects; per-photo development and pollution masks have their own purposes. Original-photo development enters Timelapse only if you enable Apply photo development, and Final image development does not become a video adjustment.
Follow the same path as you work: select what you want to inspect, adjust the appropriate tool, then update the result with Stack or Preview when needed. Finally, export the output and save the project to retain your decisions.
What each menu contains
- File: projects, import and export. Exit closes the app with the same unsaved-changes confirmation as the window's close button.
- Edit: Undo steps back through project changes or the mask you are editing.
- Process: separates actions into two submenus. Trails offers trail detection and Stack; Timelapse offers Generate preview, Export MP4… and Export sequence as PNG, JPEG or TIFF. Only actions for the active module that can run with the current photos and settings are available; MP4 requires 1080p or 4K. Cancel stops the current process. F5 stacks in Trails or generates the preview in Timelapse.
- View: switch between Trails and Timelapse under Module, change magnification under Zoom, or choose theme and language. Zoom is enabled when an image is displayed.
- Help: Open user guide, also available with F1, and About… for version and author. The guide opens directly in the interface language.
Language, theme and tool status
The status dot next to a tool helps you see whether its settings are in use:
- The accent color means the configuration is active.
- Gray means settings have changed but their application is off.
Hover over it for more information. Collapsing a section only hides its controls; its effects can remain active.
If a tool is disabled during processing, wait for the operation to finish or stop it from the bottom bar or Process → Cancel. The same bar shows the elapsed time.
You can choose light, dark or system appearance under View → Theme, and Spanish or English under View → Language. The app starts in Spanish with the dark theme; these visual preferences are not saved in projects.
A new project appears as Untitled project or Proyecto sin título until you save it, when it takes the file's name. Open Help → About… to find the application description, version and author.
 Enlarge screenshot ↗