
One method for the sky, another for the ground
Stacking combines several photos into one. You choose what to keep from each: the brightest pixels, an average, the darkest pixels, or a region from one particular photo.
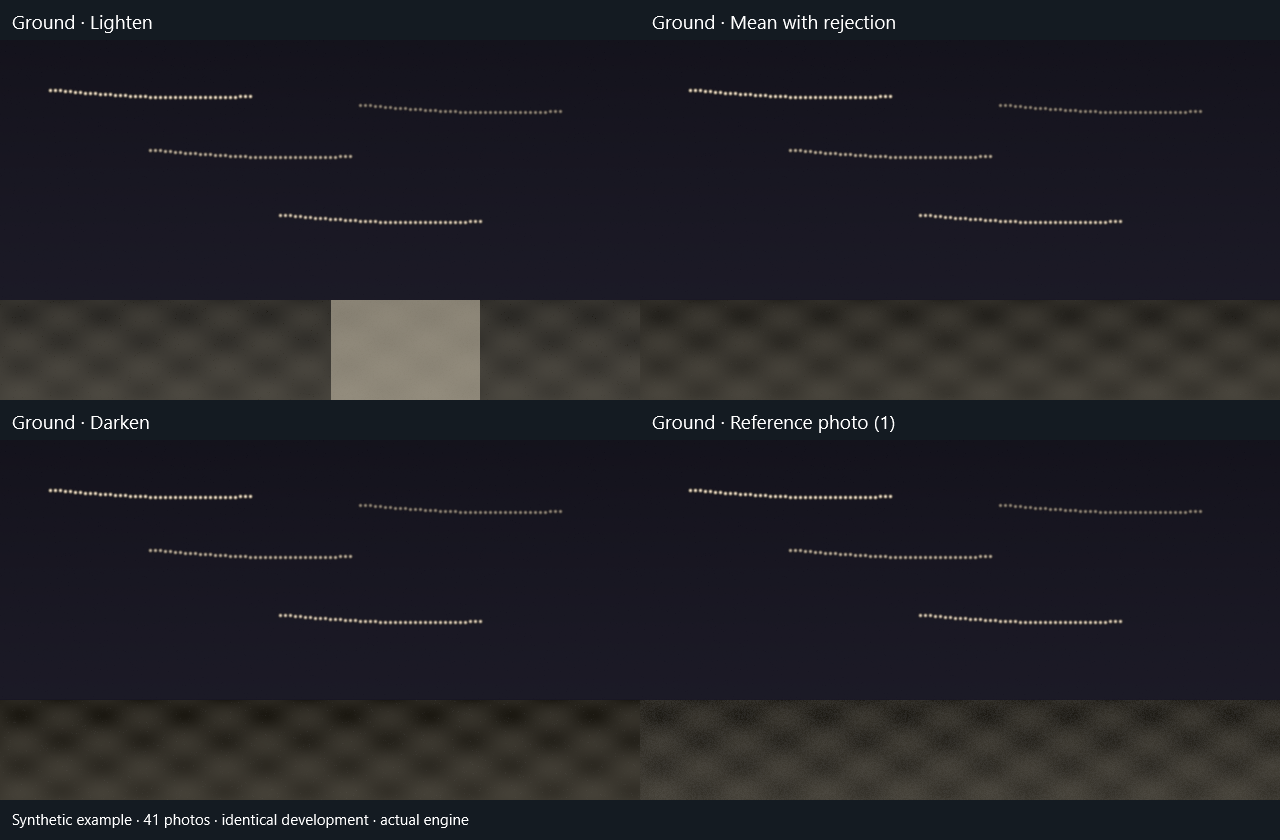
The sky moves between photos while the landscape usually stays still. You can therefore choose a method for each region: Lighten draws stellar arcs; Mean with rejection is often more useful for fixed ground. Lighten on the ground also retains passing headlights and torches.
| Intended result | Sky / Ground | How to refine it |
|---|---|---|
| Trails and all landscape illumination | Lighten / Lighten | Exclude or clean lights you do not want to accumulate. |
| Trails over stable ground with less noise | Lighten / Mean with rejection | Inspect moving vegetation and persistent lights: rejection cannot remove everything. |
| Trails over one particular landscape exposure | Lighten / No stacking · reference photo | Select the original with your preferred ground and check its name before Stack. |
| Reduce occasional landscape illumination | Lighten / Darken | Check shadows: it can also choose excessively dark contributions. |
| Examine a background without emphasizing trails | Mean with rejection for Sky | Compare faint stars: movement can attenuate them. |
| Keep the sky from one photograph | No stacking · reference photo for Sky | That region forms no new arcs and receives no Lighten effects. |
Use the landscape from one photo
The reference photo supplies a region as it appears in that shot, without combining it with other photos. This is useful when one shot has your favorite landscape lighting.
- Develop that original and select its row.
- For Ground, choose No stacking · reference photo.
- Check the name shown under Reference photo. Selecting another original before starting can change it.
- Click Stack. The reference can be excluded from the stack; its checkbox does not decide whether it supplies this region.
Correct camera movement and retain useful framing
Enable small-shift alignment if a small translation between photos duplicates the landscape. Compare against a version without alignment. Crop to common area removes borders covered by only some photos, at the cost of part of the framing. Landscape alignment and stellar noise-reduction alignment serve different purposes and need separate assessment.
For more continuous arcs, try Reduce gaps between trails after obtaining a sound baseline. For long pauses, examine reconstruction and capture timing; stronger effects cannot recover observations never made. Define a sky mask to protect the landscape: without a mask, classic comet and gap filling can affect the whole image.
Try a change and keep the previous result
- Make a first stack.
- Change the method or effect you want to try and click Stack again.
- Alternate between the two Final images to compare them.
- Select your preferred version before Export.
Each version keeps its result. Changing options prepares the next stack without changing the one already selected.
Result comparison
To make the difference easy to see, this example uses 41 synthetic photos processed by the app with identical development. In your photographs, the result will also depend on the sky and how you captured it.
Methods, versions and stacking progress
Trails always uses the high-precision linear engine; no effect or quality option needs to be enabled. RAW and 16-bit TIFF data retain their precision during processing. An 8-bit JPEG cannot regain information it never contained, but subsequent operations avoid intermediate 8-bit rounding. Detection may use 8-bit views to locate trails; stacking retains the linear photo samples. Comet fading and gap filling operate in linear light.
Lighten retains bright contributions to build star trails. Click Stack after changing frames, selection or effects. Each completed stack adds Final image 1, Final image 2, etc. to the frame list. Select a version to view it, develop its result or export it without recomputing; later changes to photos or stacking settings leave previous versions intact. Exporting a version does not create another one. Cancelled or failed operations do not add versions.
Versions retain 32-bit float linear RGB, the settings used, the mask, the crop and gap-filling comparison data when available. Each version has independent output development. Save embeds every version in the same .stproj file with lossless compression; reopening restores them.
Keep as many versions as you need: the app neither discards them automatically nor imposes a count limit. Each RGB result does, however, need about 12 bytes per pixel in memory—about 552 decimal MB for 46 MP—plus previews and optional comparison and reconstruction data. A project with many versions will take more time and disk space to save and recover.
Removing source photographs from the stack leaves completed versions available for the session. Save the project before closing it or starting another one so you can recover those versions later.
Follow the status in the bottom bar to see whether the app is detecting or cleaning trails, preparing frames, measuring luminosity, calculating a mean with rejection or combining images. During stacking, Phase current/total, for example Phase 2/5 · Measure luminance, appears alongside the region—sky, ground or whole image—and the current pass.
The total depends on your chosen methods, gap filling and cumulative saving. When saving a cumulative sequence, phase numbering continues across its images through final development; the photograph counter shows progress within the current phase.
It is normal for that counter to return to the first photo when the phase changes: statistical methods need to read photographs several times. The viewer starts showing an evolving image during Combine frames. Before then, measurement and rejection are preparing data rather than building the final trails.
The percentage covers the overall operation and reaches 100% when the new Final image is ready. When cumulative saving is enabled, the status identifies each output and its saving stage. Cancelling prevents an incomplete version from being added; completed cumulative files remain available.
Choose sky and ground stacking
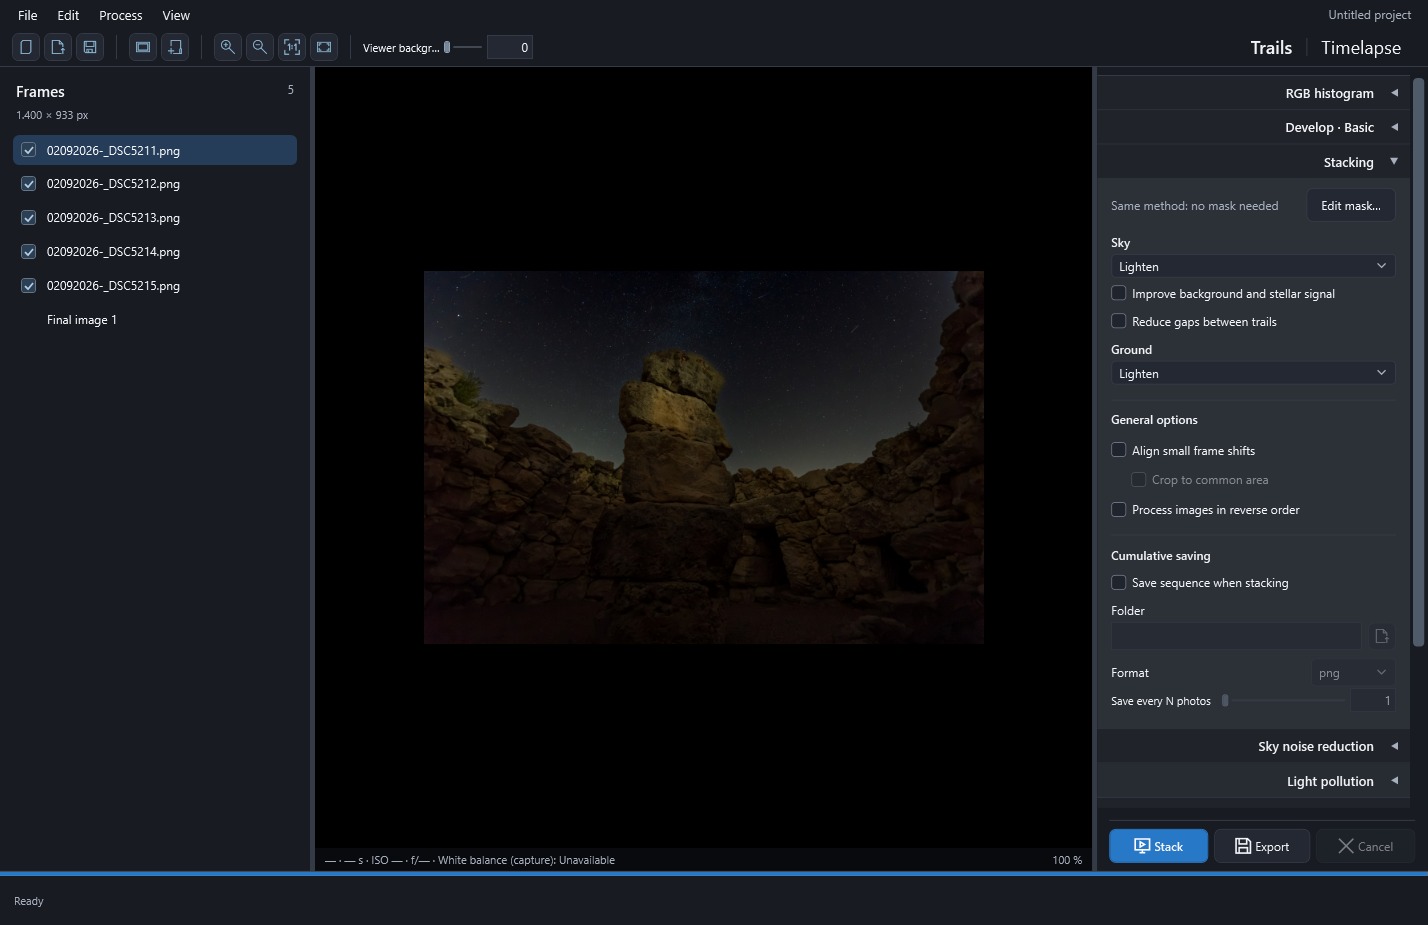
In Stacking, choose independent methods for Sky and Ground. The shared mask defines the sky; everything else is ground. Edit mask… and the mask status appear at the top. Method explanations are provided in tooltips.
| Method | Result in the chosen region |
|---|---|
| Lighten | Retains the brightest values. The initial choice for building star trails; it may also retain transient lights. |
| Mean with rejection | Averages observations after rejecting luminance outliers. Reduces noise and occasional lights in static regions; sky trails may become fainter. |
| Darken | Retains the complete RGB pixel from the frame with the lowest luminance. May help with transient illumination, but can darken shadows and attenuate trails. |
| No stacking · reference photo | Uses this region from the original photo selected when stacking starts. If a Final image is selected, uses the last selected original. |
When methods differ, the app automatically detects a sky mask when stacking if none exists. It is saved in the project and reused; use Edit mask… to refine the horizon, branches or leaves if needed. An existing mask is never replaced. Feathering blends both regions along the transition. Identical methods apply to the whole image without requiring a mask to separate regions; some additional effects still require one.
With No stacking, the section shows Reference photo and its name. The reference stays fixed during computation even if the viewer advances through other frames. It may be excluded from the stack; it retains its photo development and the framing produced by alignment and cropping. If it is no longer available, select another original before stacking. The reference path and both methods are saved with the project and each completed version.
Improve background and stellar signal, stellar noise reduction, comet fading and gap filling are available with Lighten in Sky. Other methods do not receive these effects; in particular, No stacking does not average or fade its reference region. Effect settings are retained when switching methods, but their controls are disabled while inapplicable. Trails method choices do not change Timelapse stacking.
Once you have chosen the methods and reference, click Stack to create another Final image for comparison with earlier versions. Pay particular attention to lights you want to remove: Mean with rejection or Darken cannot, by themselves, remove a defect or glow present in every photograph.
Settings that affect the whole sequence—alignment, cropping, order and cumulative saving—are under General options.
Enable Align small frame shifts to compensate for small camera translations. The app looks for a reference in the foreground of the first photo, so it needs texture in the landscape. If no reliable reference can be found, processing stops; disable alignment or use more suitable photographs. This correction does not resolve rotations or perspective changes, or follow the stars' movement.
Alignment can leave edges that are not covered by every photograph. Use Crop to common area, available with alignment, to remove those strips.
For small interruptions, Reduce gaps between trails tries to join sections with compatible direction and color. Use it for that kind of gap; a long pause may lie beyond what can be reconstructed.
You can also change the direction in which the result is built with Process images in reverse order. This reverses trail growth and comet direction while retaining the frame list order and the neighbors used for cleanup. With plain Lighten, the final result is the same in either direction.
 Enlarge screenshot ↗